You’re getting ready to dive into customizing your new Showit website template and you realize that the font you want to use is not available. What do you do? This post will walk you through how to convert your font to a web font and add custom fonts to your Showit website account so that you can use it anywhere on your Showit website. Let’s get started.
First, let’s look at what kind of font you have and whether you need to convert it to a web font. With Showit you need to have a *.woff font in order to use it on your website.
The Web Open Font Format (WOFF) is a font format for use in web pages. WOFF files are OpenType or TrueType fonts, with format-specific compression applied and additional XML metadata added. (Wikipedia)
If your font is already a .woff font then you can skip this first step. If your font is an .otf or .tff you will first need to convert it to a .woff in order to use it on your Showit website.
How to convert a font to .woff
You will need to use a conversion app or website to convert your font to a .woff font. I like to use the website Convertio to convert my files. With this tool you can drag & drop your font into their uploader, and tell it what you want to convert the font to. It will convert it and give you a download. If you are converting a couple of fonts you can use the free version of this website. If you have lots of files you may need to purchase an account if you don’t want to do it over a few days. This website is also useful if you have to convert other files like photos or video.
Upload the font to Showit
Now that you have your font in .woff format it’s time to upload it into Showit.
- Open your website in your Showit app
- Click on Media Library
- Create a folder called Fonts (this is optional but I like to keep all of my fonts in the same spot)
- Drag & drop your font from your computer into the folder
- Close the Media Library

Add the font to your Showit Website
Your font is now in your Showit account, we just need to make it available for you to use within the website you’re working on.
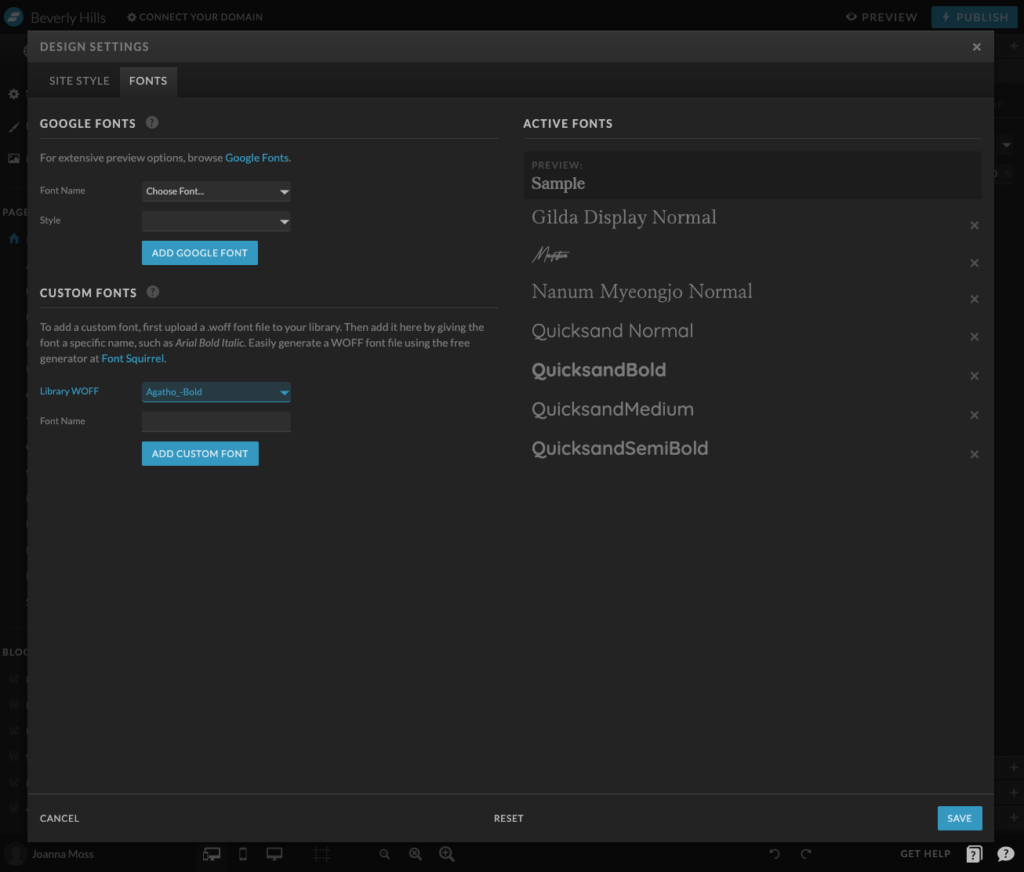
- Open the Design Settings
- Click on the Fonts tab
- Under Custom Fonts you will see a drop down for Woff Library, click on that drop down and select the font you want to add to your website.
- Under the drop down give your font a name
- Click “Add Custom Font”
- Repeat for other fonts you have uploaded
- Save and close out of the Design Settings

You can now go back to the Design Settings and use the custom font in your Site Style, or you can use the font as a one-off under text styles. Either way, you now have this font available for use on your website. This font will be available for every website you create under your account because it is uploaded to your account. However, you will have to repeat these step and add it to the other websites before you can use them. Also, review your fonts licence to make sure you are allowed to use it for multiple sites.
Showit Discount Code: Use code “JOANNA” to get 1 month free with Showit.
You may also be interested in this blog post.

Shop Tonic Website Templates
Tonic has my absolutely favorite templates in the game – their websites somehow combine killer strategy AND stunning, standout design. You're going to feel so confident in your new site!